A Patient's Guide to Artificial Hip Dislocation Precautions
Introduction
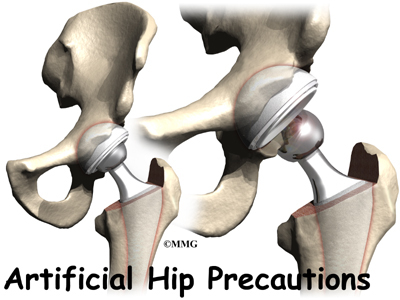
Hip surgeries such as total joint replacement and hemiarthroplasty require the surgeon to open the hip joint capsule. This puts the hip at risk of dislocating after surgery. Patients follow special precautions after surgery about which hip positions and movements need to be avoided to keep the hip from dislocating. While you are in the hospital, your health care team will remind you often about the need to follow these hip precautions. Once you get home, you will have to remember to follow these rules until your surgeon approves motion beyond these limits of movement.
This guide will help you understand
- why hip precautions are needed
- which precautions you should use and when to use them
- ideas you can use at home to protect your hip joint
Hip Anatomy
Which parts of the hip joint are affected by a dislocation?
The hip joint is one of the true ball-and-socket joints of the body. The hip socket is called the acetabulum and forms a deep cup that surrounds the ball of the upper thighbone, called the femoral head. The ball and socket is surrounded by a soft-tissue enclosure called the joint capsule. The hip itself is surrounded by the thick muscles of the buttock on the back of the hip and the upper thigh muscles on the front.
When the surgeon opens the hip joint capsule on the front edge, the procedure is called an anterior approach. Opening the joint from the back part of the joint is called a posterior approach.
Related Document: A Patient's Guide to Hip Anatomy
Rationale for Hip Precautions
Why are precautions needed to prevent a hip dislocation?
The joint capsule and ligaments keep the ball joint centered in the hip. When these soft tissues are cut during hip surgery, there is a greater risk for the ball to be forced out of the socket and dislocated after surgery while the soft tissues of the hip heal. The hip precautions you'll learn are used to keep your hip in safe positions. To do this, you need to avoid certain movements and positions. In this way, the ball will be less likely to push against the healing tissues and be forced out of the socket. Most surgeons prefer to have you use these precautions for at least six to twelve weeks after surgery until the healing tissues gain strength.
Dislocation of an artificial hip is uncommon but may occur within the first three months after surgery. The problem usually starts with a popping or slipping sensation. If the ball dislocates, you will be unable to put weight on the affected limb and will most likely experience discomfort in your hip. You should contact your orthopedic surgeon immediately and probably have someone take you to the emergency room. Putting the hip back in the socket will probably require medication given intravenously to relax the hip muscles and allow your surgeon to put the hip back into place.
Most patients will have an opportunity to work with a physical or occupational therapist before having hip joint surgery. However, patients sometimes require emergency surgery, such as after a hip fracture, and are not able to have preoperative therapy instruction.
Your therapist will go over specific precautions with you in the preoperative visit and will drill you often to make sure you practice them at all times for six to 12 weeks after surgery.
Your health care team will remind you often about these precautions. They sometimes place a sign by your hospital bed as a reminder. You'll continue to review and use these precautions until your surgeon gives the approval for you to stop using them.
General Hip Precautions
What are the precautions I should know and use to keep my hip from dislocating?
The positions and movements you'll need to avoid after surgery depend on whether your surgeon opens the joint from the front (anterior approach) or the back (posterior approach).
Anterior Approach
The main positions and movements to avoid after an anterior approach include bending the hip back, turning your hip and leg out, or spreading your leg outward.
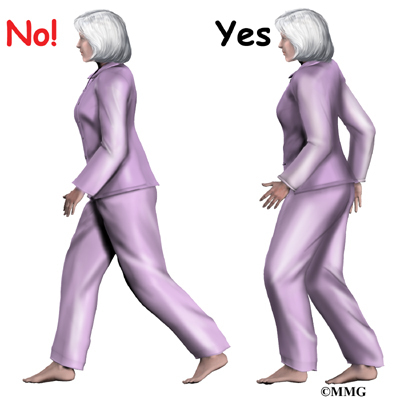
- Don't stretch your hip back. Walk with short steps. Taking a longer step when leading with your nonoperated hip stretches the surgical hip back.
- Don't kneel only on one knee. Kneeling only on the surgical hip stretches the hip back. Use both knees when you must kneel down.
- Don't turn your foot out. Place a pillow next to your hip and leg to keep your leg from turning or rolling out while lying on your back in bed.
- Don't twist your body away from your operated hip. This means don't stand with your toes pointed out. Keep the toes of your affected leg pointed forward when you stand, sit, or walk. If you turn your body away from your surgical hip without pivoting your foot, your hip will be placed in an unsafe position. Remember to lift and turn your foot as you turn.
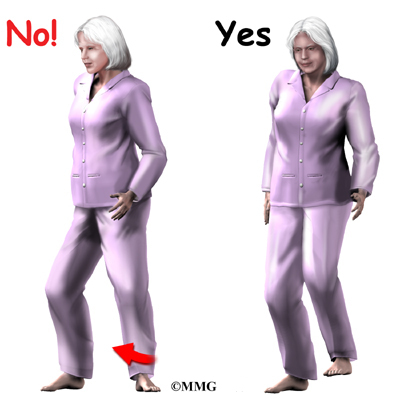
- Don't swing your leg outward away from your body. This means scooting to the side in bed by supporting your surgical leg.
- Don't put your leg in a straddling position, as though you are mounting a horse. This means preventing your leg from bending up and out when getting in or out of the bathtub. Instead, hold your leg, and lift it straight up and over the edge of the tub.
Posterior Approach
The main positions and movements to avoid after a posterior approach include crossing your legs, turning your hip and leg inward, or bending the hip more than 90 degrees.
- Don't cross your legs. When sitting, do not cross your affected leg. When lying on your back, don't roll your affected leg toward the other leg as you might do when rolling over. A pillow or triangular-shaped wedge may be used to block the legs from crossing.
- Don't roll your leg and foot in. Use a pillow between your legs when lying in bed to keep your leg from rolling inward.
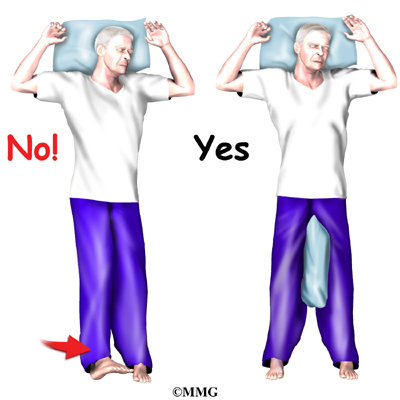
- Don't allow the knee of your operated leg to cross the midline of your body. This means don't let your knee move across your body past your navel (belly button). When lying in bed, place pillows between your legs to keep your hip in the correct position.
- Don't turn your upper body toward your sore hip. When sitting, swivel your whole body rather than turning your upper body toward your hip.
- Don't twist your body toward your operated hip. This means don't stand pigeon-toed. Keep the toes of your affected leg pointed forward when you stand, sit, or walk. If you turn your body in the direction of your surgical hip without pivoting your foot, your hip will be placed in an unsafe position. Remember to lift and turn your foot as you turn in the same direction as your surgical hip.
- Don't bend the hip past ninety degrees. This means do not lean too far forward when sitting up in bed.
Also, raising your knee up in bed can cause the hip angle to go past ninety degrees.
To avoid bending past ninety degrees when sitting in a chair, lean back slightly.
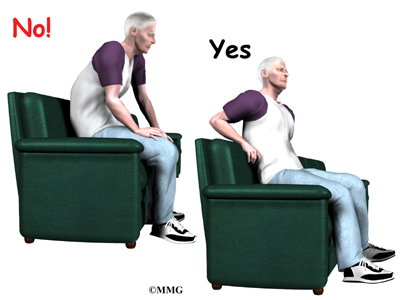
- Don't bend over past ninety degrees at the waist. Your hip may go past ninety degrees if you bend over at the waist to tie your shoes or pick up items off the floor.
Instead, use a reacher to put on your shoes and socks or to pick up items from the floor.
At-Home Considerations
What arrangements should I consider in my home to help protect my hip from dislocating?
You may require special equipment at home to keep your hip in safe positions. Following are ideas for different areas of your home.
Bathroom
Several items can be used to increase your safety in the bathroom. For instance, a toilet seat can be elevated with a raised commode seat to keep your hip from bending too far when sitting down. Getting on and off the commode may be easier with the help of handrails or grab bars securely fastened near by. For accessing your bathtub or shower, you may need one or more grab bars. For additional safety and comfort, be sure to obtain an adjustable tub or shower bench. When you first try the bench, be sure your knees are positioned slightly lower than your hips. In this way, you'll be sure to keep your hip from bending more than ninety degrees while sitting down.
Furniture
To prevent your hip from bending beyond ninety degrees, you may need to elevate your couch, chair, or recliner. A good rule of thumb is to have a seat height that is at least twenty inches above the floor. If you find that your furniture is too low, consider using a platform under your chair or couch to raise it to the desired height. Using four-by-four blocks may be helpful, but be sure that the chair or couch is safe and steady before you sit down.
Shelves and Cupboards
To avoid excessive bending and lifting, arrange your shelves and cupboards with frequently used items at waist to shoulder height. For lighter items on lower shelves, be sure to have your grabber handy to keep from bending over too far at the hip.
Summary
If you are able to see your physical or occupational therapist before surgery, you'll begin going over your hip precautions then. After surgery, your therapist will begin working with you right away and may see you one to three times each day in the hospital until you are safe to go home.
You are advised to continue using your hip precautions until your surgeon says you may discontinue following them.
|
